Essential oils provide many health benefits and are something many people, including myself use regularly. They are highly concentrated oils obtained by plants so it’s very important you use them safely… which brings me to the topic of diluting!
Many people have a misconception about diluting oils and think it weakens the power of the oils. This is not the case! Let’s dive in and learn why and how to dilute our oils!
*As always, I am not a medical professional or expert on essential oils so please always consult your doctor. This is just what I’ve learned and use based off my experiences.
Why Should You Dilute Oils
- Diluted oils are more easily absorbed in skin
- More cost effective because oils will last much longer
- Helps avoid skin irritation
- Helps to reduce the rate of oil from evaporating
- The therapeutic properties of the essential oils will be strengthened when used with carrier oils
Different Types of Carrier Oils:
A carrier oil does exactly what it sounds like… it carries the essential oils onto the skin. You want to use a vegetable oil that is typically derived from seeds, nuts or kernels.
Popular Carrier Oils:
- Almond Oil
- Fractionated Coconut Oil
- Grapeseed Oil
- Sunflower Oil
- Avocado Oil
- Jojoba
How to Dilute Based on Age/Situation:
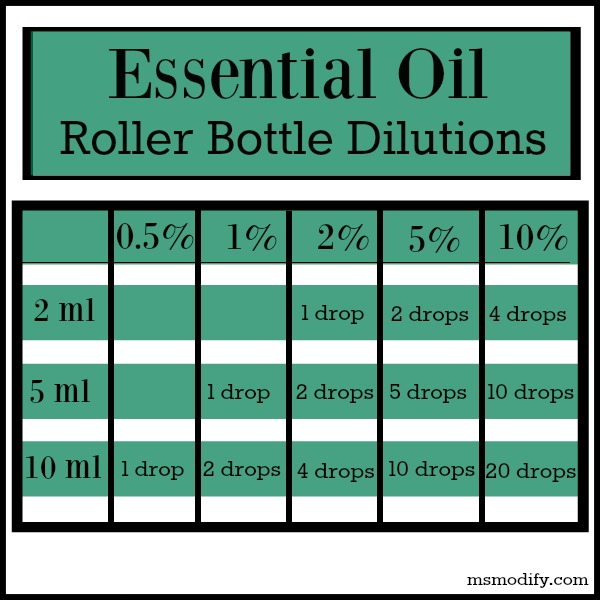
0.5%-1%: For children 2-6 years old and *pregnant women.
2%-5%: For seniors and adults with sensitive skin.
5%-10%: Adults
*Some oils are not safe during pregnancy. As always, consult your doctor first.
Supplies Needed:
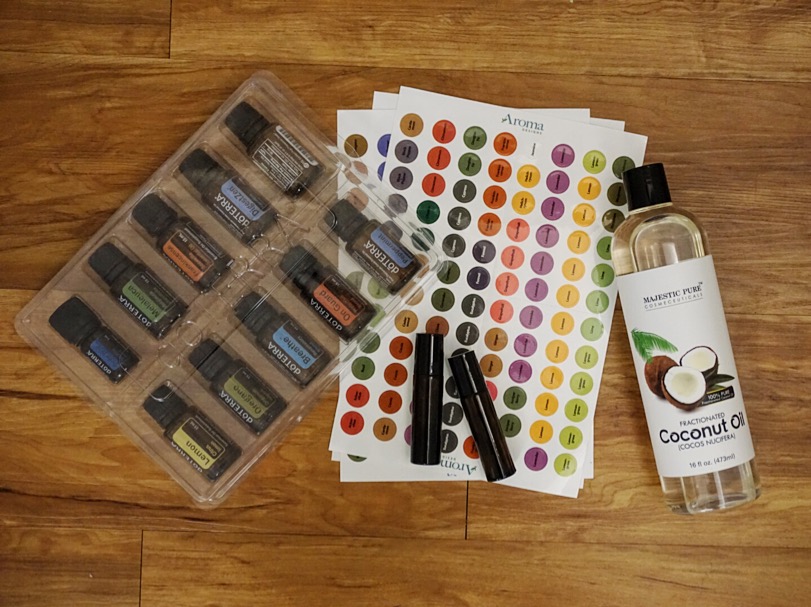
Roller Bottles: You can decide what size roller bottle works best for you. Personally I like using 10 ml bottles so they last longer. I’ve tried a few different ones, but found these to be the best quality so far.
Essential Oils: I personally use and love dōTERRA, but you can make these rollers with which ever brand you love!
Carrier Oil: Pick a carrier oil you prefer. I use fractioned coconut oil and really like how it goes on smooth without leaving a residue.
Bottle Labels: You can get labels for the oil use (ex: headache) or labels with the name of the oil (ex: peppermint).
How to Make Rollers:
It’s so simple! All you do is add the amount of drops your dilution calls for, fill the rest of the bottle up with your carrier oil, pop the roller on and place the sticker on the cap!
The bottles I get come with this handy little tool to help you easily put the roller on, and it helps make sure it’s secure and won’t spill!
There you have it, now you know how to safely dilute your essential oils!
If you are new to essential oils and want to learn the basics, make sure you read a post I did on “Essential Oils 101”.
*Ms.Modify is a participant in the Amazon Services LLC Associates Program, an affiliate advertising program designed to provide a means for sites to earn advertising fees by advertising and linking to amazon.com


I need to learn to make these especially with cold &flu season coming up – get some of those peppermint ones ready to keep an open head.
I keep a peppermint roller in my purse at all times! They’re so easy to make, you should give it a try! 🙂
I just love using Essential Oils, more so especially this time of year when cold/flu season is in play.
I agree! I’ve been using my OnGuard a lot lately!
Oh this is great – I just picked up two scents for my diffuser!! xo, biana –BlovedBoston
Thanks! I saw on Pinterest different fall scents for diffusers… I want to try them!
I never would have known you could mix it with sunflower oil! I need to find some empty rollers for myself!
I know I didn’t know about sunflower oil either! I always use fractionated coconut oil.